


Sign In
My Fabrics
0
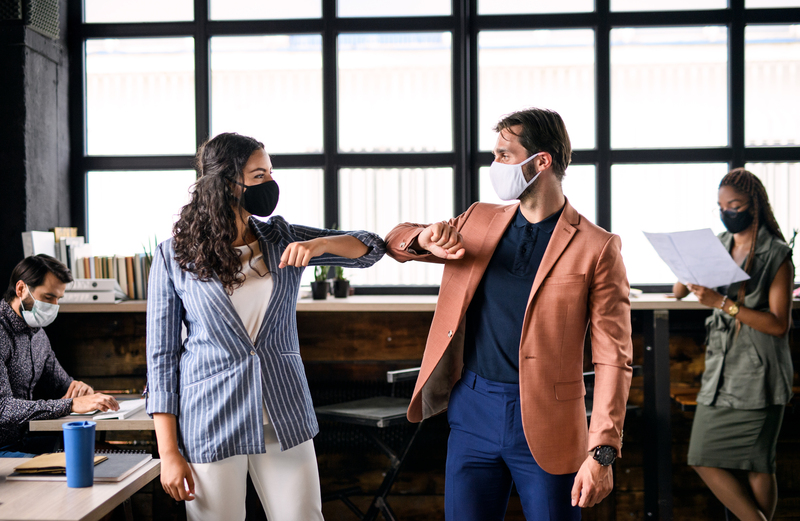
Regardless of opinion, today’s world is what it is. Marshall Dry Goods believes we should all err on the side of caution in order to prevent the spread of Covid-19, the flu, as well as other viruses. Who would have thought a year ago that we would be needing to wear a face mask to go to school, to work, to shop, to go out to eat, basically for doing most anything outside of our homes?
According to the CDC, “Face masks are recommended as a simple barrier to help prevent respiratory droplets from traveling into the air and onto other people when the person wearing the mask coughs, sneezes, talks, or raises their voice. This is called source control. This recommendation is based on what is known about the role respiratory droplets play in the spread of the virus that causes COVID-19, paired with emerging evidence from clinical and laboratory studies that shows masks reduce the spray of droplets when worn over the nose and mouth. COVID-19 spreads mainly among people who are in close contact with one another (within about 6 feet), so the use of masks is particularly important in settings where people are close to each other or where social distancing is difficult to maintain.”
Because the subject of masks is so prevalent, and is on the mind of many who sew, here are some basic guidelines to consider when making your own face mask. We published a blog a few months ago about the subject, so you could consider this a part-2, now that we are in the heat of the pandemic battle. Next month we will look at face masks for kids!
When sewing a self-made face mask, it is preferred to use a boil-proof fabric. As we’ve mentioned in a previous blog, the most popular opinions say that using 100% cotton material is the most commonly used fabric to make masks. It is suggested that you use one print for the front of the face mask, and a different print for the back side. This will enable the wearer to identify which side is facing the public. Some advise using a liner or a filter in the mask as well.
If you start looking online, you will be overwhelmed with instructions for self-made masks of all kinds. If you want to make one that has a more ergonomic fit, the folded mask is most common. The New York Times recently published an article with many helpful suggestions when making your mask. Their tutorial is simple, and is one of thousands you can find on the internet. Here is a summary of their instructions:
TOOLS NEEDED:
Needle and thread (and a sewing machine, if you have one)
Scissors
Pins or clips to hold fabrics in place (safety pins and paper clips will also work in a pinch)
MATERIALS NEEDED:
At least 20 by 20 inches of 100 percent cotton fabric, such as a flat tea towel
4 strips of cotton fabric for ties, about 18” long and ¾” wide
OR
4 flat, clean shoelaces
OR
Two flat (1/4”) sewing elastics that are 7” long each
PREPARE YOUR MATERIALS
Choose your piece of cotton fabric, pre-wash it on the warmest setting and dry it on high heat. (Tea towels are better to use than T-shirts or linens, according to the Stanford Anesthesia Informatics and Media Lab.)
Fold the fabric in half. Measure and cut out a 9.5” by 6.5” rectangle to create two identically sized layers. This is your mask base.
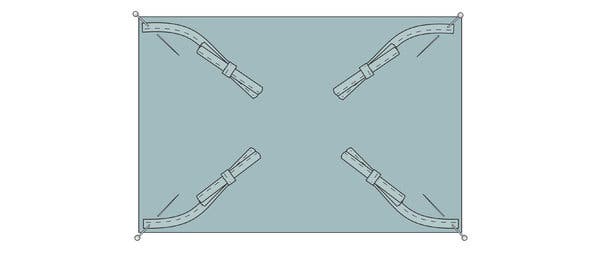
FABRIC TIES - Step 1
Cut 4 thin pieces of material, about 18” long and ¾” wide. Fold each piece of fabric twice lengthwise, then once more to tuck the rough edges inside. Sew a straight line along the middle. This will prevent the fabric ties from having frayed edges.
ADDING THE TIES - Step 2
Take one of your rectangular fabric layers. With the “right side” (or the outer-facing side, where the pattern might be) facing you, pin down the 4 fabric ties, one piece per corner. Make sure that the ties are gathered in the center of the fabric layer before advancing to the next step.
You can also substitute sewing elastic for fabric ties, but note that elastic cannot be bleached (and therefore, is not as easy to clean) and that anyone with a latex allergy cannot wear it. (Note that elastic is also increasingly in short supply) Attach elastics to the first layer of fabric by securing the ends at the corners, forming little hoops. Make sure the elastic lies inside the perimeter of your fabric.
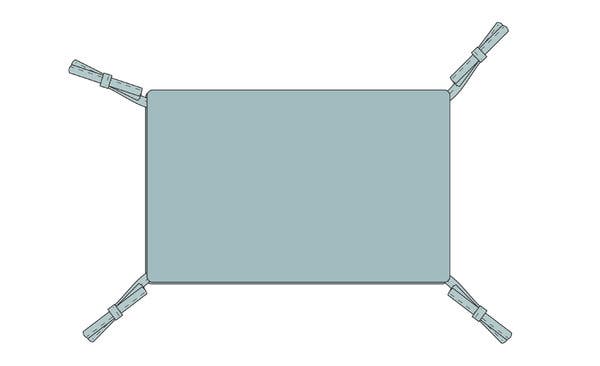
PUTTING IT TOGETHER - Step 3
Take the second layer of fabric and line it up with the first. The “right sides” (or patterned sides) of the fabric should be facing each other, sandwiching the fabric ties or elastics. Secure the fabric sandwich together with pins.
START STITCHING - Step 4
Eyeball a midway point. From the middle, sew a straight line across the mask, about ¼” above the bottom edge of the fabric, toward the bottom left-hand corner. Remove any pins as you sew past them.
STITCH ALL AROUND - Step 5
Stitch all around the perimeter of the fabric layers, repeating the forward and backward motion at each corner to secure all the elastic ends or fabric ties. Continue to stitch your way toward the starting point, but stop to allow for a 1 ½” gap.
TURN OUT - Step 6
PLEATS PLEASE - Step 7
Make three staggered pleats lengthwise on the mask, as if folding a paper fan. This helps the mask conform to the wearer’s face. Secure each pleat with pins.
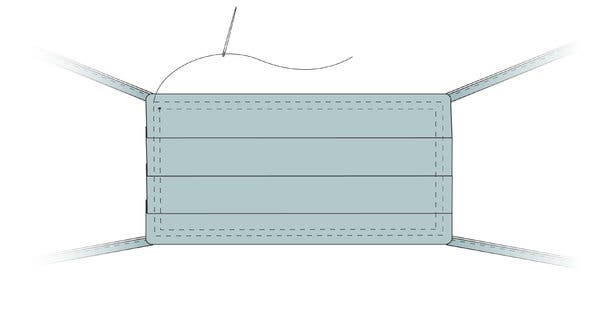
FINISHING UP - Step 8
With your pleats held in place by pins, stitch around the perimeter of the mask, ¼” away from the edge of the seam. This is called a top stitch. Take care when stitching over the pleats as the fabric may be quite thick. Top stitch a second time around, about ¼” in from the first round of stitching. Now you have a completed mask.
Always wash your mask after you’ve made it. Also wash them as often as possible after being out and about. Remember that you could have fallen sick without even knowing it! The virus could then have spread to the fabric, and the mask could become the source of danger because it gets in contact with the face. When you wash them, use hot water that is 60°C minimum (90°C is preferred). After they are washed and dried, only touch them “with pointed fingers” (and washed hands!) on the outside, ideally only on the straps.
At Marshall Dry Goods, we pride ourselves with years of experience and expertise. The trick is to understand what goes into making something, and making it right. We have been there, done that. Regardless of what your next project is - face masks or not - we have the fabric you need, and the knowledge to help you make it happen. Passing along our advice from lessons learned over the years is part of what we do best. Visit us online or give us a call and let us help guide you in making your next project a success!
-------------